
Equipping a lab with epoxy resin gear is not about picking from a catalog; it’s about choosing tools that perform under pressure, last for years, and make your experiments safer and more reliable. Whether you're building out a high school chemistry lab or upgrading a university or R&D space, this guide gives you exactly what you need to make smart, lasting choices.
From lab countertops to crucibles, drying racks to safety gear, we break down the differences between materials, the must-haves for chemical environments, and the mistakes to avoid when buying lab equipment. If you're unsure where to start or what specs you need, we can help with custom quotes, even from a pencil sketch.
Let’s start with the fundamentals: what epoxy resin is, and why it still leads the way for lab-grade equipment.
Is Epoxy Resin a Plastic? A Closer Look at the Material Behind Lab Surfaces
Epoxy resin gets lumped into the plastic category often, but that’s not the full story. Understanding what epoxy resin is and why we rely on it for lab-grade surfaces starts with knowing how it behaves under stress, heat, and chemicals. It’s not a flexible, mass-market polymer. It’s something tougher.
Epoxy resin is a thermosetting polymer, which means once it cures, it doesn't melt, reshape, or soften under high temperatures. That alone sets it apart from most plastics used in consumer goods or general-purpose construction. In lab environments, we work with surfaces that might be exposed to acids, solvents, open flames, and extreme mechanical abuse. You can’t use soft plastics here. That’s why epoxy resin lab surfaces dominate across the scientific and education industries.
What gives epoxy resin its edge is the way it cross-links during the curing process, locking molecules into a rigid, non-reactive structure. That makes it highly chemical-resistant and ideal for repeated use in high-intensity settings. When we install epoxy resin countertops, they’re not decoration; they’re there to survive years of thermal shocks, spills, and heavy instruments.
Is it safe?
Yes, when fully cured, epoxy is stable, low-odor, and resistant to fire. That’s a major reason we use it for critical lab zones like fume hood interiors and sink surrounds. But it’s pivotal to note that not all epoxy is created equal. DIY kits and general-use resins lack the heat tolerance and chemical resistance of lab-grade options like the ones we work with daily.
Compared to other resins like phenolic or Trespa, epoxy brings a balance of toughness and thermal resistance. Phenolic might be a better choice in budget-sensitive builds or where water resistance takes priority, while Trespa offers anti-bacterial advantages in bio-sensitive zones. But for sheer chemical abuse and thermal control? Epoxy holds the line.
We don't sell these materials, we build with them, quote around them, and help labs design for them. That’s why our Request a Quote process exists. If you’re not sure whether epoxy resin is the right material for your space, we’ll walk you through the decision. That’s what we do.
Crucibles in Chemistry Labs: Uses, Materials, and Modern Misunderstandings

Crucibles don’t get flashy catalog space, but they’re one of the hardest-working tools in the chemistry lab.
Their job?
It contains extreme temperatures, aggressive reactions, and fragile outcomes. But if you ask ten lab techs what crucible to use or how to store them, you’ll hear ten different answers. That’s where things go sideways.
What Is a Crucible and Why Does It Matter in Lab Experiments
At its core, a crucible is a heatproof container built for thermal decomposition, calcination, and redox reactions, anything that requires intense, sustained heat. You’ll usually find them perched on a clay triangle over a burner, turning raw materials into ash, oxides, or elemental residues. In analytical chemistry, they're essential for accurate mass loss calculations and gravimetric tests.
Their shape and lid design keep volatile reactions contained and reduce contamination from air exposure. Crucibles may not look exciting, but their stability under fire is what keeps experiments valid and safe.
Choosing the Right Crucible Material for the Job
Not all crucibles are created equal, and yes, material matters price. We’ve seen labs try to stretch budgets by mixing and matching materials, but that rarely ends well. Here’s a breakdown of common options:
-
Porcelain: Great for general use, but it didn't handle rapid thermal changes well. Best for consistent, moderate heating.
-
Alumina: High-end, high-temp stability. Ideal for rigorous thermal work.
-
Graphite: Used when conductivity is needed, think metallurgical experiments.
-
Metal (like nickel or steel): Limited use in chemistry due to reactivity.
And then there’s the wildcard: lead crucibles. We’ve seen them come up in threads with users wondering,
What SOP even calls for this?
The confusion is understandable. Lead melts at around 327°C, so it’s not meant for high-temp work. Its value might lie in shielding for radioactive samples or low-temp electrochemistry, but most labs won’t (and shouldn’t) touch them without a specialized protocol. If you’re unsure, skip them.
One valid concern that keeps surfacing:
What if my crucible melts?
The answer depends on knowing the material’s maximum service temperature, which should always be listed by the manufacturer.
Crucible Safety 101: Handling, Storage, and Replacement
Handling hot crucibles is no joke. Always use crucible tongs, not beaker tongs, and work over a clay triangle or wire gauze to keep things stable. Crucibles should be stored in padded trays and kept away from metal tools or shelves where chipping is likely.
One mistake we still see in educational settings? Using cookware as a crucible substitute. Not only is it unsafe, but it can ruin experiments due to impurities or inconsistent heating. We recommend stocking at least two spares for every size. Crucibles are fragile, and the n+2 rule applies here to most gear.
And yes, if you’ve lost a lid or cracked one, you can absolutely use a second crucible inverted as a makeshift cover, make sure it matches the material and size to maintain thermal balance.
We include proper crucible accessories and advice when labs reach out via our Request a Quote form. It's not about upselling, it’s about making sure your gear lineup doesn't create risk.
High School Chemistry Lab Equipment: The Essential Checklist
When you're setting up or updating a high school chemistry lab, the gear list can spiral fast, especially if you’re working from generic supplier catalogs. We help schools across the country equip labs every spring, and we’ve seen what works and what ends up unused in the back of a cabinet. This section keeps things focused on what your lab needs to run smoothly and safely.
Foundational Tools for Every Lab
Every lab needs the basics; this is your daily driver equipment. That means a solid inventory of beakers, Erlenmeyer flasks, graduated cylinders, and stirring rods. These tools do most of the prep and transfer work. For setup and stability, include ring stands, iron rings, and funnel holders.
A proper heat source is non-negotiable. Most high school labs still rely on Bunsen burners, paired with tripod stands and wire gauze. Don’t forget funnels for filtration and transfer, simple but easy to overlook. If you're not sure what combinations make sense for your layout, start with our custom quote system, and we’ll tailor it around your course load, not a cookie-cutter checklist.
Heating & Measurement Essentials
This is where things get specific, and sometimes misunderstood. High school labs need crucibles, evaporating dishes, thermometers, balances, and hot plates to handle heating, measuring, and reduction tasks.
There’s a recurring question we’ve seen from new instructors on forums:
Do I need crucibles if I already have dishes and beakers?
Yes, you do. Crucibles are designed for direct flame and intense thermal stress. Beakers and evaporating dishes can't handle that kind of load without breaking or skewing results. Each tool exists for a reason, and crucibles are essential for serious thermal decomposition and mass-loss experiments.
Common Equipment Ordering Mistakes to Avoid
This is where most first-time lab orders run into trouble.
First, crucibles and other fragile gear are often under-ordered. If a student chips one or a lid breaks mid-semester, the whole lab timeline takes a hit. We always recommend applying the n+2 rule: order at least two extras for every size you use regularly.
Second, don’t let the catalog drive your decisions. Schools often buy full kits filled with things they’ll never use, because the list looks complete. Instead, align your order to your actual lab curriculum. What reactions are you running? What units will require heat or precise mass measurement? That’s the gear you need.
We see this mistake less when instructors start their planning through our quoting process. We’ve done this long enough to know what’s useful and what’s shelf clutter.
PPE and Safety Gear for Chemistry Labs: What You Need
Most lab injuries don’t happen during the dangerous parts; they happen when someone forgets goggles, grabs hot glassware, or skips the emergency protocol. We see this all the time when working with schools and labs: the gear is there, but it’s not always being used right. That’s why outfitting your lab is only half the job. The other half is choosing the gear your team will wear and understand.
Essential Personal Protective Equipment
Start with the obvious, because it’s the gear that gets used every day. That means safety goggles with side shielding (not fashion glasses), nitrile gloves that resist chemicals without tearing, and properly sized lab coats or vinyl aprons.
Stocking enough for the entire class period, not the entire roster, is usually sufficient, but keep a few backup pairs of each size. And skip the shared coat rack. Individual labeling or disposable options reduce cross-contamination and improve compliance, especially in shared classroom environments.
Emergency Equipment That’s Not Optional
No lab is complete without emergency gear, and no safety plan works without clear placement and training. At a minimum, your lab should have:
-
Eye wash stations
-
Fire blankets
-
Chemical spill kits
-
First aid kits
-
Emergency shutoff valves for gas and power
Every one of these items needs to be visible, unobstructed, and regularly inspected. If you’re quoting a new lab or replacing outdated infrastructure, these should be front and center, not buried under miscellaneous. We include these elements in our quoting guidance when schools plan full-lab overhauls.
Safe Handling of Acids, Bases, and Heat Sources
Even with the best PPE, things go wrong when gear is misused. Crucibles fresh off a burner can cause permanent burns if grabbed without tongs. Acid spills can eat through gloves not rated for the task. That’s why handling protocols should go hand-in-hand with ordering equipment.
Use labeled storage cabinets for corrosives and flammables, and pegboards or drying racks to ensure glassware doesn't collect residues that cause surprise reactions later. We supply epoxy and phenolic pegboards designed for lab use, because drying glassware on a towel is not unprofessional, it’s unsafe.
Epoxy Resin Lab Countertops: Pros, Cons, and Buying Advice
We work with epoxy resin every day, and we’ve seen what it can take and what it can’t. Whether you’re building a new lab from scratch or replacing outdated surfaces, epoxy is often the first material labs ask about. But not every resin is equal, and not every application needs epoxy. The value is knowing when it makes sense, and when it doesn't.
Why Labs Trust Epoxy Resin Countertops
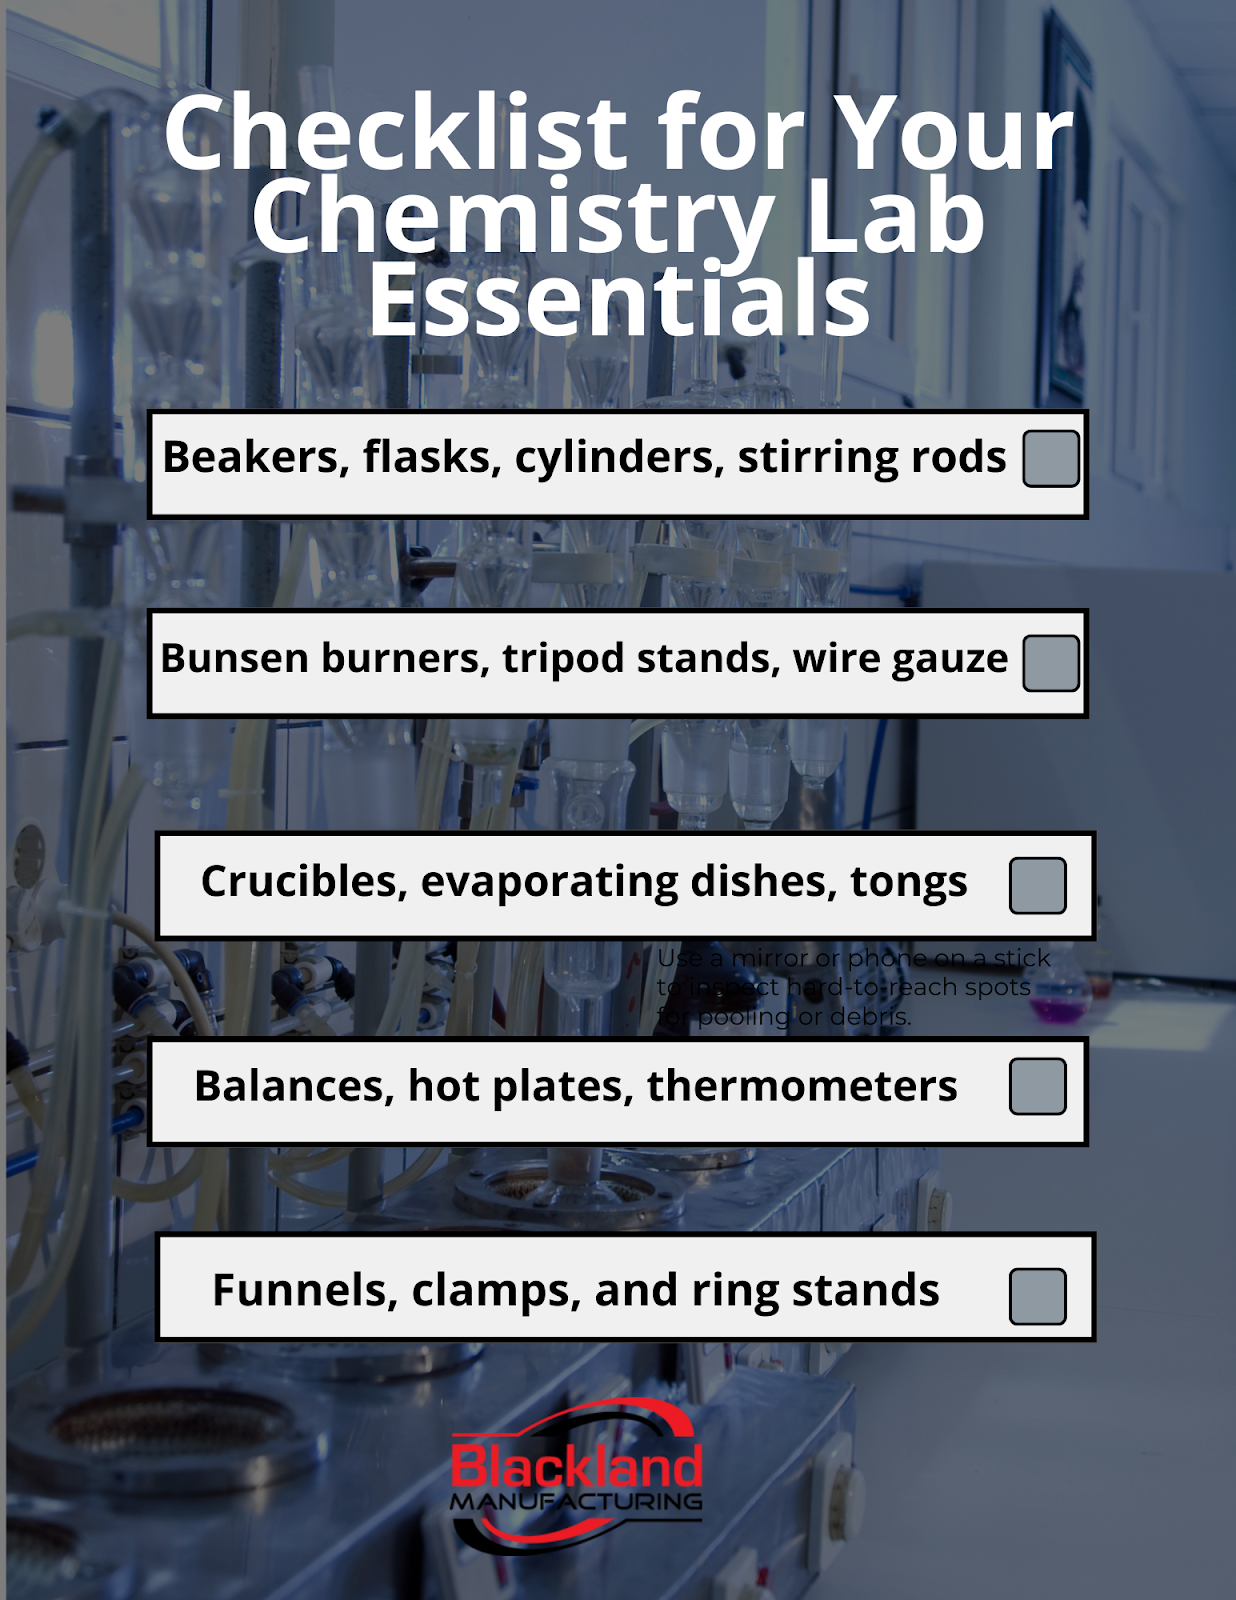
Epoxy resin countertops earned their reputation the hard way: by holding up under open flames, chemical spills, and constant wear in the toughest lab conditions. The surface is heat-resistant, scratch-resistant, and chemically inert once cured, making it a go-to material for general science labs, high school classrooms, and research spaces alike.
What makes epoxy different from plastics is that it’s a thermosetting polymer. Once it’s cured, it didn't melt or deform under heat. That stability means your work surface won’t warp from Bunsen burners or corrode from acids, two problems that cheaper laminates or DIY coatings can’t handle. That’s also why all of our lab-grade work surfaces are built around the demands of chemical environments, not cosmetic trends.
Downsides to Consider
That said, epoxy is not bulletproof, and it’s not foolproof either. One of the biggest risks we see? DIY epoxy countertop projects. We’ve seen schools try to save money by applying hardware-store kits, only to end up with surfaces that crack, bubble, or react to common solvents. The stuff we work with is not something you can buy off the shelf. It’s poured, cured, cut, and sealed by professionals with the right tools and the right specs.
There’s also the question of sustainability. Epoxy is not biodegradable, and it doesn't break down in landfills like some newer surface technologies. But the flip side is longevity. A well-installed epoxy surface can last 20+ years with minimal maintenance, reducing waste and replacement costs long-term.
Alternatives to Epoxy: When to Use Phenolic or Stainless Steel
Epoxy is great, but it’s not always the best fit. If you’re working in a setting where moisture resistance and aesthetics are vital, raw heat performance, phenolic resin can be a smarter option. It’s lighter, more affordable, and still resistant to a wide range of chemicals. That’s why we often recommend it for secondary workspaces, student labs, or prep rooms.
On the other hand, stainless steel is ideal near sinks, wet zones, or biological workstations. It’s not durable, but it’s also seamless, easy to sanitize, and doesn't chip or discolor like resins can under physical abuse. For example, in labs where corrosion control and microbial cleanliness are top priorities, custom stainless steel work surfaces may be the better fit, and we quote those too, depending on your spec.
If you’re unsure what fits your application, we’ll walk you through the pros, cons, and price differences. That’s what our Request a Quote system is built to do: match materials to how your lab operates.
Crucial Safety Cabinets & Workstations: BSC Class Comparison
When it comes to safety cabinets and biosafety workstations, vague advice can get dangerous fast. We’ve seen too many labs buy based on price or general recommendations, only to find their BSC didn't meet actual containment needs. Understanding the difference between BSC classes is not optional; it’s how you protect your staff, your samples, and your entire workflow.
Class I vs. II vs. III: What the Labels Mean
-
Class I BSCs provide personnel and environmental protection, but no product protection. Air is pulled in through the front and filtered out, making them useful for basic containment, not sterile processes.
-
Class II BSCs come in five subtypes: A1, A2, B1, B2, and C1. These are the most commonly used cabinets in BSL-1 and BSL-2 labs. They offer product, personnel, and environmental protection. The differences come down to airflow dynamics and how exhaust is handled:
-
A1 & A2: Recirculate most air; A2 offers better containment via improved airflow patterns.
-
B1: Exhausts contaminated air directly outside; suitable for work with trace amounts of volatile chemicals.
-
B2: Total exhaust with no recirculation, critical for labs handling toxic vapors.
-
C1: Hybrid system, configurable between recirculation and exhaust modes depending on the application.
-
Class III BSCs are fully enclosed, gas-tight systems used in BSL-3 and BSL-4 environments. They’re designed for the most hazardous agents and require sealed glove access and dedicated exhaust systems.
If you’re not sure which model aligns with your biosafety level or lab requirements, we strongly recommend going beyond generic advice. The wrong BSC didn't create risk; it can invalidate certifications or inspections.
Matching the Right BSC to Your Lab Type
Your lab’s BSC should be chosen based on biosafety level, sample type, and chemical use.
If you're outfitting or upgrading a biosafety cabinet alongside new lab surfaces or workstations, we can guide you through compatibility, ventilation considerations, and downstream safety setups. While we don’t sell BSCs directly, the material specs for your countertops, drying racks, and sink surrounds need to match your biosafety level. You can explore those work surface options here.
Align Safety Cabinets to Lab Risks
If there’s one piece of advice we stand behind, it’s this: don’t choose safety cabinets based on catalog blurbs or price points alone. Every lab carries different pathogen risks, chemical profiles, and workflow demands. Use that information to guide your selection, or reach out through our Request a Quote portal. We’ll help you spec materials that make sense, even if they’re not the cheapest or most common.
What Lab Users Are Saying About Their Equipment (And What They're Missing)
Lab equipment didn't fail in theory; it fails in use. That’s why we pay attention to what people are saying after they’ve lived with their gear. Forums, especially among researchers and educators, offer a brutally honest look at how well equipment holds up. What’s clear? It’s not always the product that’s broken; it’s the process behind how it was chosen.
Feedback on BSC Brands
In BSL-2 labs, we’ve seen Labconco, Thermo, and Esco come up repeatedly. Users tend to rank Labconco high for build quality and consistent containment, though the learning curve and service expectations vary. Thermo gets mixed reviews; some praise the airflow design, others call out maintenance headaches. Esco, especially in teaching environments, is noted for affordability but flagged for variability in support and setup.
What stands out across the board is that users want reliability, clarity, and fast support. You don’t need every feature. You need the right ones. And that’s exactly how we approach quotes for surfaces, sinks, or epoxy drying racks. We match specs to actual need, not brochure gloss.
Why Is This in the Lab?
Another trend we’ve seen in threads is confusion over why certain tools are even in the lab. Lead crucibles came up in one discussion where no one could identify their purpose. Turns out, they had been ordered years ago for a discontinued process, and no one had removed them from inventory. That’s not a rare case; it happens often.
This points to a deeper issue: SOPs are missing, outdated, or siloed. Without documentation on why something was purchased or when it was last used, tools linger in drawers long after their relevance is gone. And when budgets are tight, that kind of waste adds up fast.
If you’re building out a new lab or refreshing your equipment list, this is the perfect time to audit what you’re carrying. We help labs rethink their workflows when quoting new epoxy countertops or phenolic pegboards, but we also ask the questions most suppliers don’t: Do you still need that? Why was it used in the first place?
Closing the Loop: Better Gear Starts with Better Processes
The smartest labs don’t buy equipment; they build systems that keep those purchases accountable. That means pairing every order with a clear use case, updating SOPs when gear changes, and training staff to flag obsolete or questionable tools.
That’s why our Request a Quote process didn't feel like a shopping cart. It’s a starting point for matching products to applications. We’ve worked with hundreds of labs, schools, biotech, R&D, and the most successful ones treat ordering as part of their safety and performance planning, not an afterthought.
We’re not here to tell you what’s standard. We’re here to help you get what’s smart.
What to Ask Before You Buy Chemistry Lab Equipment
Buying lab equipment is not about checking boxes; it’s about making sure each piece supports the work you're doing. We’ve seen too many labs with shelves full of gear no one touches, or worse, equipment used incorrectly because no one knew why it was there. This checklist helps avoid that.
Does this item match your actual experiments?
Start with your curriculum or protocol list, not a catalog. If you’re not running combustion or calcination experiments, you probably don’t need six crucibles. But if you are? You’d better have the right ones and backups. Our Request a Quote process is designed to walk through this with you, so you’re not guessing.
Do you have the correct accessories?
Tools without their partners are either useless or dangerous. Crucibles need clay triangles. Drying racks need pegs. Epoxy resin surfaces around sinks need proper backsplash sealing. Don’t wait until install day to realize you’re missing what makes the setup work.
If you’re ordering pegboards or drying racks, we include free replacement pegs for a year for exactly this reason. You shouldn’t have to scramble when a student snaps one off.
Can you explain its function to someone else?
If no one in the lab can say why an item is there or what it’s used for, it probably didn't belong. We’ve helped labs clean out drawers of tools that hadn’t been touched in years. Keep what you can teach. Store what you can label. Ditch what no one can explain.
Do you know when it needs replacing or maintenance?
Some gear, like crucibles or balances, degrades slowly. Others, like drying racks or epoxy countertops, hide their wear until it's too late. Knowing the lifespan of what you’re buying helps avoid mid-semester failures. We often recommend that labs keep a simple replacement log or check-in system for high-risk tools.
If you’re upgrading surfaces, start with our countertop collections. We spec every order based on use, not guesswork.