
Equipping a high school chemistry lab starts with essentials that ensure safety, accuracy, and day-to-day functionality. This guide outlines must-have gear, safety tools, and expert tips to build a resilient and efficient classroom lab.
Epoxy countertops, durable glassware, and proper safety stations form the backbone of any functional chemistry lab. From Bunsen burners to digital balances, each item in this guide is selected based on use in active high school science classrooms.
Planning a summer upgrade?
Now’s the time. This guide provides the full gear checklist, as well as ordering quantities by class size, safety compliance insights, and advice from educators who’ve built labs from scratch.
Let’s examine the core chemistry gear every high school lab needs to function safely and effectively, and how to scale it smartly for your classroom size and budget.
Core Chemistry Lab Equipment You Can’t Skip
Setting up a high school chemistry lab starts with equipment that will be used every week. Whether you're preparing for basic titration or a flame test, this core gear forms the foundation of every experiment. It is the backbone of your lab.
Glassware Must-Haves

If your lab didn't have solid glassware, everything else falls apart. These are the pieces students will use daily for mixing, heating, and observing reactions.
-
Beakers (250–500 mL standard): Ideal for holding and mixing solutions. We’ve found that 250 mL and 400 mL sizes cover 90% of high school lab needs.
-
Graduated Cylinders: These are essential for volume measurement. Teach students how to read the meniscus line early; it’s one of the most misread tools in any chemistry setting.
-
Test Tubes & Racks: Affordable, durable, and versatile. Keep a range of sizes handy, and always invest in sturdy racks that don’t tip. Test tube drying racks can double as pegboards, which we supply in epoxy, phenolic, acrylic, and stainless steel.
-
Volumetric Flasks vs. Erlenmeyer Flasks: Use volumetric flasks for accuracy in preparing solutions. Erlenmeyer flasks are better for swirling and reactions that involve gases or heat.
One user shared, I was tasked with setting up a lab and had ABSOLUTELY NO LABWARE. If you’re in that boat, don’t wait to get essentials in place first.
Measurement Tools
Accuracy matters. Even basic experiments fall apart when your measurements are inconsistent. Invest in solid measurement tools that your students can learn on and trust.
-
Digital Balances and Spring Scales: You’ll want digital balances that measure in grams (to the hundredth if possible) and spring scales for introducing force and weight.
-
Thermometers (Alcohol-Based): Skip the mercury. Alcohol thermometers are safer and accurate enough for high school labs. Make sure you’ve got a few per lab station.
-
pH Paper and Universal Indicators: These tools are excellent for teaching acidity and alkalinity. They’re inexpensive and show chemical reactions, always a win for engagement.
Transfer and Handling Tools
These smaller items often get missed in ordering but are used in nearly every lab session.
-
Droppers, Pipettes, Stirring Rods: These tools teach precision from day one. Glass or plastic pipettes can be reused, while disposable options help with cleanup.
-
Spatulas, Scoopulas, and Tongs: These make material handling safe and efficient. Don't skimp here; stainless-steel options last longer and are easier to clean.
Heating and Reaction Tools
Controlling heat safely is critical in any chemistry lab. The tools in this section help students observe and manage reactions, from slow evaporation to vigorous combustion, without putting themselves or your classroom at risk. Use this gear to teach both precision and respect for chemical processes.
Heat Sources
Whether you're boiling water, igniting a flame test, or evaporating a solution, choosing the right heat source is a budget decision, and it's a safety call.
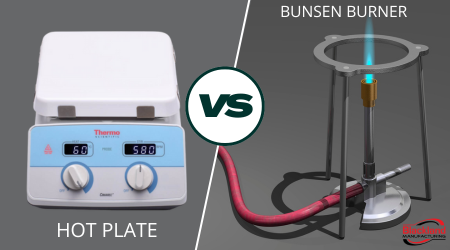
Hot Plate Stirrers vs. Bunsen Burners: Hot plates are more controlled, safer for beginners, and double as stirrers for mixing solutions. Bunsen burners, however, are essential when flame reactions are required, especially for labs demonstrating combustion or metal ion flame colors.
What Experiments Require an Open Flame?
A common teacher question. Examples include flame tests for ions (like sodium and copper), combustion of elements, or quick sterilization of instruments. When using burners, always ensure you have safety equipment and protective surfaces in place.
Flame-Safe Accessories
The gear around your heat source matters as much as the flame itself. These tools stabilize your setup and protect your students.
-
Crucibles, Clay Triangles, Wire Gauze, and Striker: Crucibles are used for high-heat reactions. Clay triangles support crucibles over burners, and wire gauze distributes heat evenly under glassware. A striker safely ignites the burner; matches don’t belong here.
-
Drying Ovens: Worth It? They’re rarely essential but are great for advanced experiments, AP-level work, or prep labs. If your school budget allows and you plan to dry or cure solids regularly, it's a valuable upgrade.
Glassware That Handles Heat
Glass failures under flame are dangerous and avoidable. Heat-ready tools are for any lab using open flame or hot plates.
-
Borosilicate Test Tubes and Flasks: These are resistant to thermal shock and won’t crack under sudden temperature changes. They’re a must for any heat-based experiment.
-
Rubber Stoppers: Know Their Limits: Not all rubber is created equal. Avoid sealing flasks that will be heated, as pressure buildup can cause them to pop or burst. Use vented alternatives or leave vessels unsealed during reactions.
Safety Equipment Every High School Lab Must Include
Safety is not something to think about later; it’s baked into every decision you make when setting up your lab. From personal gear to storage and ventilation, this section walks through the safety tools that every chemistry classroom needs to protect students, teachers, and your program.
Personal Protective Equipment (PPE)
Students can’t focus on experiments if they’re worried about exposure, and they shouldn’t have to. PPE builds good habits and minimizes risk in every lab activity.
-
Goggles, Lab Coats, Nitrile Gloves: Stock up on ANSI-certified goggles, chemical-resistant lab coats, and nitrile gloves in multiple sizes. Avoid latex, it’s cheaper but brings allergy risks and weaker chemical resistance.
-
Teacher Issue: Why do I always get too many smalls and not enough medium gloves? Always track your class sizes and age groups. High schools often underestimate how many mediums are needed. It’s better to over-order your most-used sizes than short your students.
Safety Stations
Whether you're working with acids, bases, or a burner, your students need emergency access to basic response equipment.
-
Eye Wash Station, First Aid, Fire Extinguisher: They are required, not extras. Ensure your eyewash unit is plumbed and not a bottle. Mount the fire extinguisher where it’s visible and reachable.
-
Storage Protocols for Chemical Safety: Use color-coded, labeled cabinets to separate acids, bases, oxidizers, and flammables. Vented epoxy resin storage surfaces are smart near sink areas to prevent cross-contamination.
Chemical Storage and Legal Concerns
Many teachers inherit chemical inventories with little training on what’s allowed. That creates legal and safety risks.
-
What Can’t Be Stored in High School Labs? Hydrofluoric acid (HF), benzene, picric acid, and many heavy metals are off-limits or require special handling. Always refer to your state’s school chemical safety guidelines and SDS sheets.
-
Is it legal to store certain high-concentration chemicals in a high school? Often, it’s not. Schools must comply with OSHA, NFPA, and local codes. If you’re unsure, don’t store it. Partner with suppliers who understand K–12 compliance standards.
Safety Cabinets and Fume Hoods
These are the most misunderstood safety purchases, and often the most under-budgeted.
-
When Are They Required vs. Nice to Have? Flammable cabinets are required if you’re storing alcohols, acetone, or volatile solvents. Fume hoods are strongly recommended for demos involving combustion, fumes, or strong acids, but they’re not mandatory for all schools.
-
Tips for Schools on a Tight Budget: You don’t need the fanciest fume hood on the market. Start with a ductless option or prioritize epoxy-lined safety cabinets that meet OSHA and NFPA codes. Ask us for compliant yet affordable options; we know how to work with tight timelines and tighter funding.
Classroom Equipment That’s Often Forgotten (But You’ll Wish You Had)
Once the basics are ordered, most labs still end up missing a few critical pieces, items that don’t make the catalog highlights but impact day-to-day flow. These overlooked tools improve efficiency, reduce cleanup time, and help students stay focused on learning, not searching for equipment.
Cleaning and Support Tools
These are the workhorses that keep your lab functional. Forget them, and you’ll spend more time fixing problems than running experiments.
-
Test Tube Brushes, Wash Bottles, Label Tape: Clean glassware is not optional, especially when you’re reusing flasks or test tubes. Washing bottles with distilled water is essential for rinsing. Label tape keeps things organized and reduces the chance of cross-contamination.
-
Pegboards for Drying Glassware: Glassware drying racks are easily forgotten until you have 30 wet beakers and nowhere to put them. Our epoxy and phenolic pegboards are designed for schools, come in custom sizes, and include free polypropylene pegs with one year of replacements, perfect for high-use environments.
Experiment Organization
Keeping your lab clean is one thing, keeping it organized enough to run back-to-back classes is another.
-
Molecular Model Kits: Simple to use, visually effective, and a lifesaver for teachers explaining bonding and molecular geometry. These tools make abstract concepts click, especially for visual learners.
-
Storage Bottles, Racks, and Labeling Systems: You’ll need a consistent, visible way to store everything from buffers to acids. Lockable storage with chemical-resistant labels is worth the investment.
Anti-Vibration Balance Tables
A standard classroom table might seem good enough until you run a precision lab, and the numbers bounce around like popcorn.

Why These Tables Matter: Even small vibrations, from footsteps, HVAC systems, or other students, can throw off digital balances. Balance tables are specifically engineered to isolate sensitive instruments.
How to Estimate Quantities by Class Size (Not a Static List)
It’s one thing to know what gear to buy; it’s another to know how much of it you need. Ordering too little slows labs down. Ordering too much drains your budget. The key is to plan with scale in mind, and that starts with numbers from actual classrooms.
A Scalable Approach
When ordering lab supplies, quantity matters as much as quality. A lab serving 10 students needs a very different setup than one supporting 30. Here’s how to think about scaling without overcommitting.
What to Order for a Class of 10 vs. 30
For a class of 10, plan for 5 lab stations (2 students per). That means 5 beakers per size, 5 sets of goggles, 5 test tube racks, and so on. For 30 students? Triple that baseline, unless your class rotates equipment between periods, in which case, you'll need cleaning and drying capacity too. (Our pegboards help here.)
Example Checklist from Teachers: One teacher shared their stock:
-
15–20 small, medium, and large beakers
-
3 digital balances for group rotations
-
12 tongs and stirring rods
-
Extra gloves in every size, especially mediums
Their rule? Anything a student touches, order enough for a pair to share.
Common Mistake: Buying One or Two of Everything: This is the fastest way to frustrate students and stall experiments. One balance or one graduated cylinder per class hadn't cut it. Always think in sets, not singles. If budget is tight, invest in durable items first (glassware, balances, drying equipment), then build out from there.
Customization, Budget, and Smart Purchasing Tips
You’re not outfitting a lab for a week, you’re building it to last through years of lessons, spills, and student wear-and-tear. It’s tempting to chase the cheapest option, but in education environments, short-term savings usually cost more long term. The smarter play? Build it right, the first time.
Buy Once, Cry Never
Lab equipment is not the place to cut corners. Teachers who go bargain-bin with gear often end up spending more on replacements than they would have on quality tools from the start.
-
How Quality Saves Money Over Time: We’ve seen classrooms buy low-cost pegboards that warp, balances that won’t balance, and test tubes that shatter under basic heat. High school labs are hard on gear. Invest in what will last.
-
Why Teachers Regret Ordering Low-Cost, Non-Lab Grade Gear: One of the most common regrets we hear is choosing "Amazon science kits" over commercial-grade materials. They might look the part, but they’re not designed for repeated student use or any kind of chemical exposure.
Our Custom Quote System
Most school labs don’t fit neatly into a pre-designed box. That’s why we’ve built a quote process around the way educators work.
-
Accepts Hand-Drawn Layouts: Yes, even pencil sketches. If you’ve got a rough idea of what you need, pegboard placement, sink positioning, and work surface dimensions, we’ll take it and turn it into a clear quote.
-
Free Countertop Material Samples: Need to present options to the admin or facilities? We’ll ship lab-grade epoxy, phenolic, and Trespa samples at no cost so you can choose the right material for your space.
-
Pegboards with Customizable Sizes and Peg Options: Whether you need a compact acrylic rack or a wall-mounted epoxy resin pegboard, we can match your specs, and every board comes with free pegs and one year of replacements.
LEED Credits & Eco-Friendly Choices
Schools pursuing LEED certification or aiming to reduce environmental impact can make smart choices with materials that also perform under pressure.
-
How Epoxy and Phenolic Surfaces Support LEED Goals: Our epoxy and phenolic countertops contribute to LEED points under categories like recycled content, regional sourcing, and low-emission materials. That means you get surfaces built to withstand years of use and help support your school’s sustainability goals.
Checklist for Your School Lab Setup
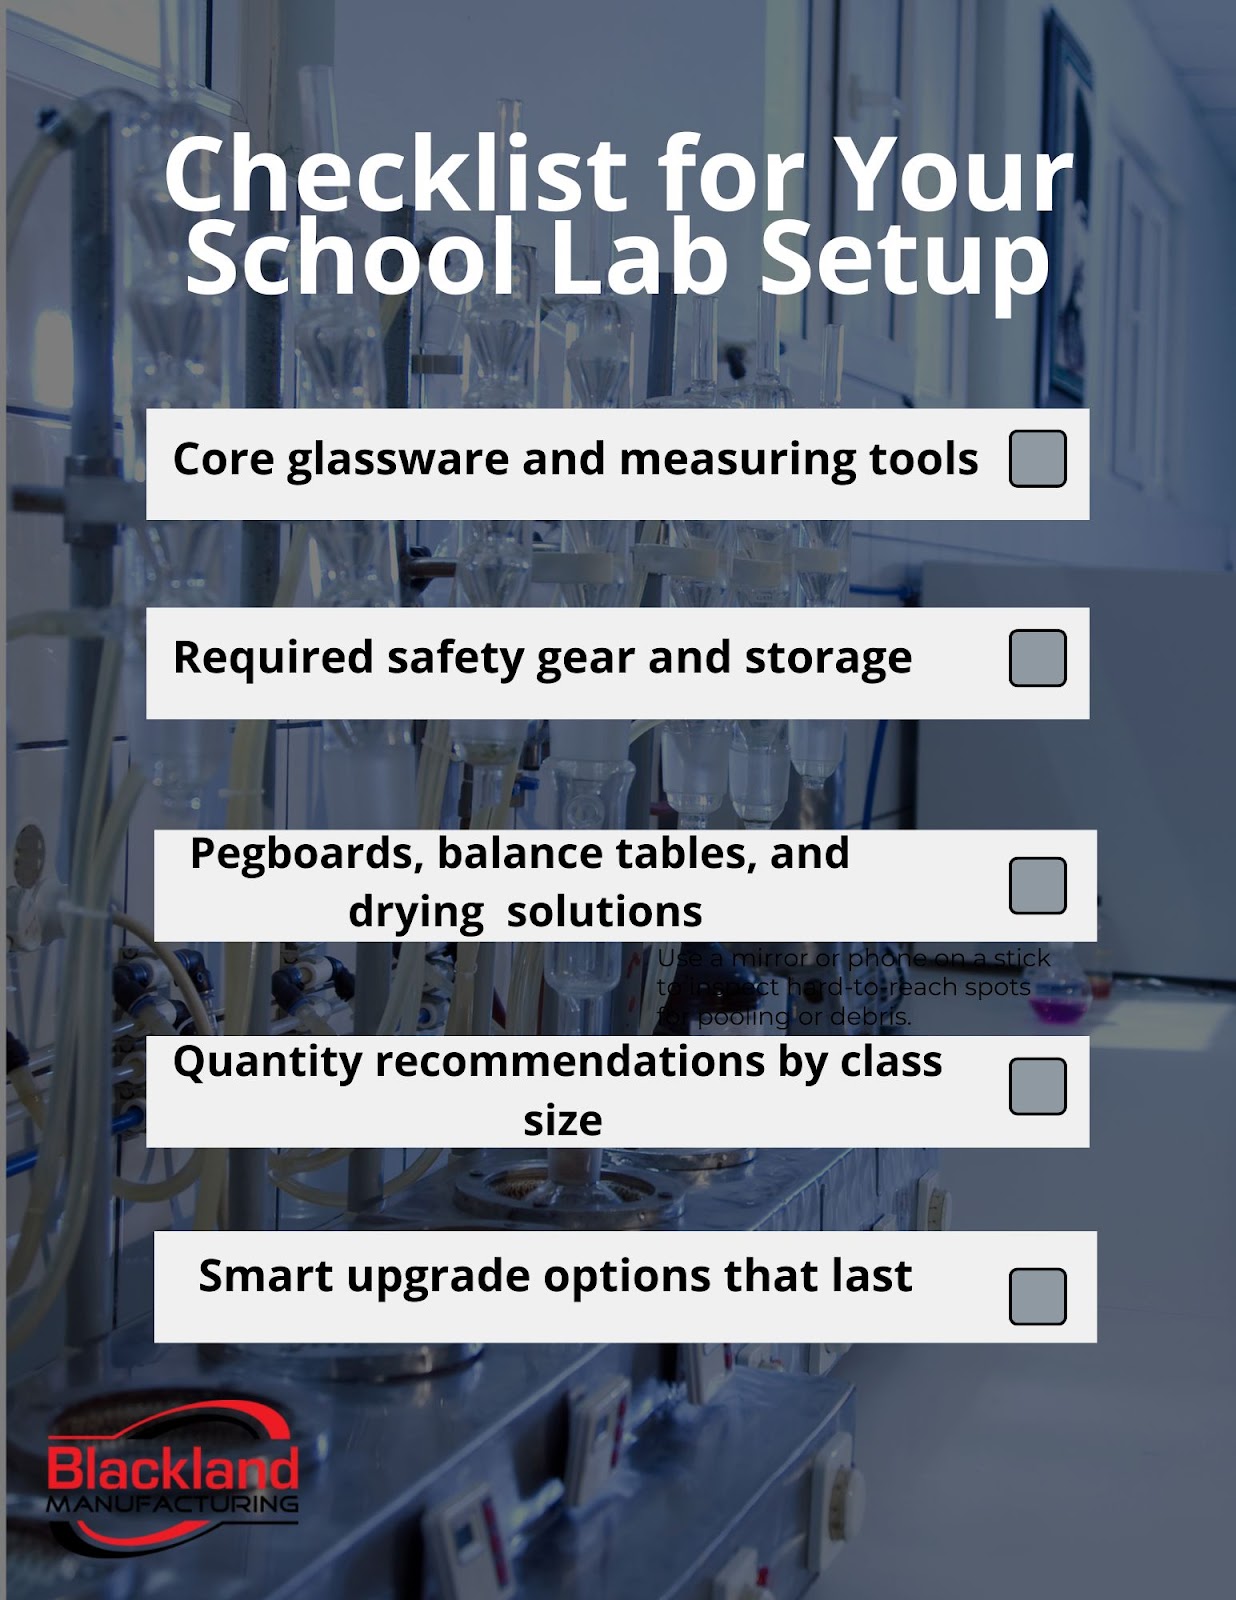
Ready to take action without second-guessing what you might have missed?
We’ve built a practical checklist based on everything in this guide, essentials, safety gear, quantities, and commonly forgotten tools. Perfect for teachers building a lab from scratch or updating a tired workspace.
-
Core glassware and measuring tools
-
Required safety gear and storage
-
Pegboards, balance tables, and drying solutions
-
Quantity recommendations by class size
-
Smart upgrade options that last
Use the checklist as a starting point to request a quote. We accept pencil sketches, scaled drawings, and everything in between, because great labs don’t start with forms. They start with people who know what they’re building.
Questions Teachers Ask (and Answers They Never Get from Supply Catalogs)
Catalogs are great for product codes, not so great for solving lab problems. Teachers are often left with more questions than answers when trying to build a safe, functional lab. These are the questions we hear most, along with what works in a school setting.
What’s the Safest Way to Demonstrate Chemical Reactions with Flame?
Controlled flame demos, like metal ion tests or combustion reactions, can be incredible teaching moments, but only if you’re set up properly.
-
Always run open flame reactions under a vented surface or near a hood.
-
Use crucibles, wire gauze, and tongs rated for high temperatures.
-
Keep safety stations, especially eye wash and extinguishers, within arm’s reach.
-
Avoid ethanol-based demonstrations unless you have proper supervision and ventilation.
What Items Are Usually Forgotten in First-Time Orders?
This comes up constantly. Some of the most forgotten, but most used, items include:
-
Test tube brushes and wash bottles
-
Label tape and chemical-safe markers
-
Pegboards for drying glassware
-
Spare gloves in a full-size range (especially medium)
-
Enough balance for group work
It’s not always about big-ticket gear; often, it’s the daily-use items that go missing.
How Do I Organize My Lab So I Can Teach, Not Hunt for Test Tubes?
Organization saves your sanity. We recommend:
-
Clear labeling on every bottle and drawer
-
Dedicated drying and storage areas for cleaned glassware
-
Mobile carts for shared tools like balances or test tube racks
-
A standing inventory list by the prep sink that gets updated quarterly
When things have a place, students learn faster, and labs run smoother.
What’s the Safest and Most Durable Material for Countertops?
We've tested them all in school environments. Here's what holds up:
-
Epoxy Resin: Handles heat, acid, and impact. Still our most recommended lab-grade surface.
-
Phenolic Resin: Lighter and water-resistant. A solid mid-tier choice with good chemical durability.
-
Trespa: Offers antibacterial properties and a high-end finish, often chosen for cleanrooms or biotech spaces.
-
Stainless Steel: Durable and heat-resistant, but not ideal around strong acids or bases unless properly coated.
Most schools update their labs during summer closures, making spring the busiest quoting season of the year. We prioritize quote turnaround during this window, and we accept everything from detailed CAD drawings to hand-sketched layouts. If you’re planning, request a quote early to lock in lead times.